Tips on Writing a Book – How to Write a Book
 Are you looking for tips on writing a book? In this post, I will share with you strategies on how to write a book from outline to finish line. My focus is on writing nonfiction books because I have personally written and published 40+ nonfiction books and have developed a system that works for me.
There are literally endless possibilities for the books you can write and publish. I look forward to helping you move forward so you can finish writing and publish your nonfiction book.
And the benefits of publishing your book can last a lifetime. Here are just a few of the benefits possible to you as a published author:
- Credibility
- Authority in your niche
- Exposure for your business
- Reach more people with your message (even internationally)
- Get leads for your business, 24/7, on autopilot
- Find new clients for your services
- Diversify your income
- And more!
As you get started with my tips on writing a book, I want to ask you these questions:
- What is your main goal?
- Is writing a book a priority for you right now?
- If so, what are you willing to give up?
You may have to put something down in order to pick up something new. For example, you may decide to give up two hours of watching television in order to work on your book. Or you may choose to limit your social media to 30 minutes a day while finishing your book.
Whatever you choose, I encourage you to use the content I am going to share in this post and create a system that works for you. Then rinse and repeat. The more that you do it, the more efficient you will become at it.
One of the most rewarding parts of my job is to see my clients finish their projects and publish their books.
Tips on Writing a Book: Accountability
One way to get the motivation to finish your book is to have accountability. You can get public accountability by sharing on social media or with your email list about your book project.
You can also get private accountability by asking another author to be an accountability partner. I have done this in the past and it has motivated me to finish my projects.
Get FREE Access to the Book, Video Training, and Mindmap
I encourage you to click here to download my book (PDF and Kindle), video training and mind map that corresponds with this post.
Tips of Writing a Book Outline to Finish Line
Once you choose a topic, the next step is to create an outline. I know some people resist outlines because they prefer to “fly by the seat of their pants.” In the writing world, this is called “being a pantster.”
However, I strongly recommend that you outline your book first. This will allow you to write your book in the quickest, most effective, and least frustrating way.
Believe me. It works!
Every time I do create an outline FIRST, I am able to write the book quickly. Taking time to outline your book will save you hours of writing time.
This is one of my tips on writing a book I recommend to every writer. Even if you do a very basic outline, I believe it will help you overcome writers’ block because you will always know what to write next. If you don’t feel ready to write one section or chapter, work on another chapter instead. The goal is to keep your writing flowing.
The Brain Dump
What is a brain dump? Basically, you take some time to simply write down everything you can think of on a certain topic. Do not limit yourself in any way. Write down everything you might want to include in your book. Ask yourself, “What do my readers need to know on this topic?”
Once you have finished a brain dump and have listed everything you want to include in your book, the next step is to start your official outline.
I recommend you start your outline with your chapter titles. For example, if your book has seven chapters and would be broken down as follows:
- Introduction
- Chapter One: TITLE
- Chapter Two: TITLE
- Chapter Three: TITLE
- Chapter Four: TITLE
- Chapter Five: TITLE
- Chapter Six: TITLE
- Chapter Seven: TITLE
- Conclusion
As you fill in the titles for each chapter, look at the flow and decide what makes the most sense. Is there something that needs to come before something else? For instance, when writing and publishing a book you need to outline it before you start to write it. Look at your chapter topics and make sure they follow a logical sequence in what you are teaching or sharing.
Once you have those chapters set up, it is time to start filling in the meat of your book.
Basically, you will put 3-5 main points under each chapter. Some chapters may have more, depending on how long they will be. I recommend you start with writing a short e-book (around 10,000 words); therefore, 3-5 main points for each chapter should be enough.
However, you can use a similar format with any length of book you write.
Book Outline Formula
This is the book outline formula I recommend for nonfiction books:
- Introduction
- Chapter one
- Main chapters
- Conclusion
Introduction:
I usually start with an introduction, which can include the benefits (what your reader will learn from your book). The benefits of your book are different from the features.
So, think about the benefits your reader will get from your book and include them in your introduction.
The introduction is also an important part of your Kindle book because it will most likely be available through Amazon’s “Look Inside” feature. Therefore, you want to make it as compelling as possible to draw your potential reader into your book, then buy it, and continue reading.
Chapter One:
Either in your introduction or in chapter one, including your own story. For instance, in this post, I shared that my first book took me one year to write and publish, whereas my last book took me one week. I also shared that the turning point for me was when I learned a repeatable system.
In your story, you can include:
- What your situation was like before
- The turning point
- And what the results were after your turning point
Pretty simple, right?
Main Chapters:
This will be the meat of your book, where you will share most of your information and what you’ll come up during your brain dump.
Conclusion:
Your conclusion can simply be a summary of everything you have covered in the book. It is good to include all the key points and/or steps again. This repetition helps solidify the content in your reader’s mind and it helps bring closure to your nonfiction book.
Once you finish this process, you will have a great foundation for how to write a book.
Prefer to Read?
Click here to download my book “Outline to Finish Line” (PDF and Kindle) that corresponds with this post and includes my tips on writing a book. You can read it any time AND have it for a reference later.
Now, let’s move on to the process you can use to outline your book using one of the following 10 strategies.
Option One: Whiteboard
The first strategy you can use to outline your book is to use a whiteboard. I LOVE using a whiteboard and actually made my own! I used a few resources online when I made my whiteboard including this article: http://www.bargainhoot.com/2011/02/28/our-new-dry-erase-board-its-so-much-fun-and-easy-to-make/
I recommend you use your whiteboard as a place for capturing all your ideas in a brain dump. And I like the versatility of this strategy. You can use different color markers, you can erase, and you can add information.
Personally, when I feel stuck, I get off of my computer, walk over to my whiteboard, and start writing. It helps me get the flow of thoughts going again when I feel stuck.
This is one way to get inspiration offline that you can then take online.
You may also want to consider using a whiteboard desk. I think it’s brilliant idea to have a desk that you can doodle on, write on, and make use of that creative space.
Here are a couple resources to consider:
Ikea: http://www.ikeahackers.net/2012/10/whiteboard-desk.html
DIY: http://nicoleayang.com/blog/diy-whiteboard-desk

This was the brain dump I did when I was coming up with my brand. I was writing a lot of different ideas on the whiteboard. You can see how I used different colors and I wrote my ideas in different places. This allowed me to focus on what I wanted to use for my brand. Using the whiteboard brain dump method gave me a lot of clarity.
When you outline a book, you can do something similar when choosing the topics or chapters you want to include. After you have a working outline on the whiteboard, you can then take it and put it into whatever word processing or writing software you are using.
Therefore, the first strategy is using a whiteboard. I love this option, especially if you are feeling stuck. It is a great way to get all of your senses involved: writing, visual, and tactile.
Option Two: Mind Mapping
The second way to outline your nonfiction book is to use a mind map. It was at the end of 2013 that I was introduced to the power of mind mapping. I had known about it for years, but when I finally put it into practice, I immediately saw results. I was stuck on a project I was working on at the time. I was translating one of my books into Spanish and was at a standstill. However, after creating a mind map, my book was published within a week. I now use mind maps in many different areas of my business because it has helped me to be more productive.
There are tools you can use to create a mind map outline of your book.
On my computer, I to use the free software, FreeMind. It is very easy to use and you can download it here.
On my mobile devices, I use the app SimpleMind. SimpleMind is available for your iPhone and iPad or Android device. You can also use it on your computer. The thing I like about the SimpleMind app is that I can export a mind map from my iPad or iPhone to Dropbox as a .mm file, which is the format used in FreeMind.
These programs can be used on the go.
For example, I can mind map a project on my phone and then export it to Dropbox. I can later open this same file on FreeMind on my computer and continue to work where I left off. This functionality allows for improved productivity.
This is another one of my tips on writing a book because you can make progress on your book anywhere.
One day I was sitting in a long line to get my car washed. I got out my phone and started mind mapping a blog post. When I arrived home, I was able to write my blog post quickly because I already had it outlined using the mind map. What would have been wasted time waiting in the line at the car wash was transformed into productive time using the SimpleMind app.
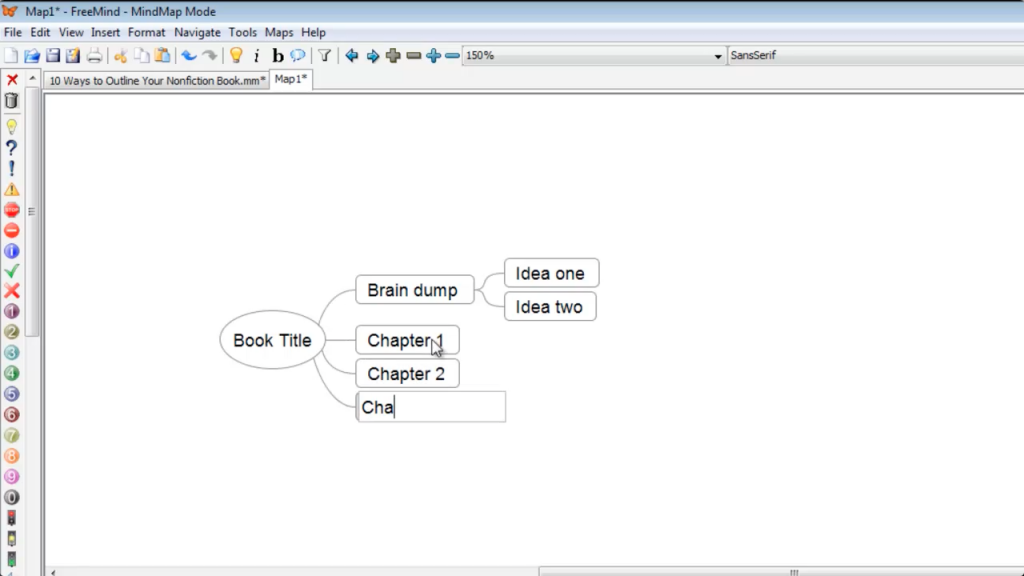
A great feature of using Freemind is that is is possible to copy, the entire mind map and then paste it into Microsoft Word as text. This text can then be the start of the outline of your book.

Watch the video below for a live demonstration on how to do a brain dump and use mind mapping software to outline a book. I love using mind mapping and it is one of my tips on writing a book. However, as I share in this post, there are many other options you can use as well.
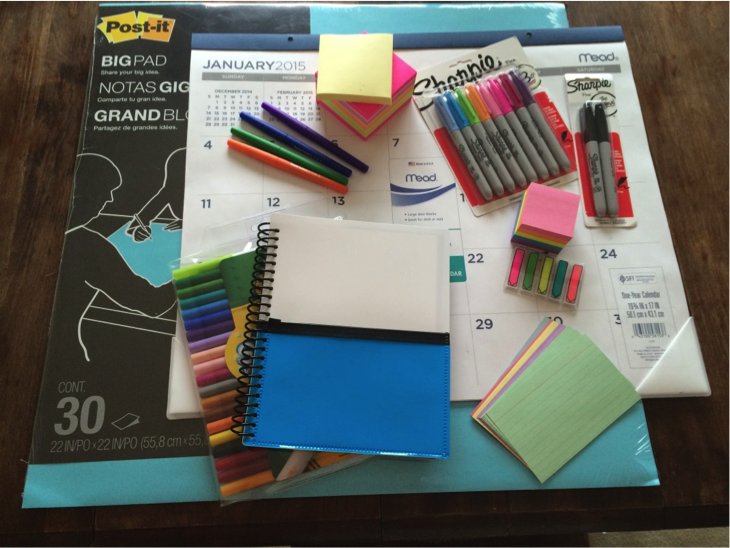
Option Three: Sticky Notes
The third strategy I recommend to outline your book is to use sticky notes. Yes, sticky notes.
Some of you may not like technology or may not want to learn new software like FreeMind. Therefore, you can use sticky notes in a similar way as a mind map. I have integrated offline mind mapping with sticky notes into my business and it has helped me tremendously.
The tools that you would need are: markers and sticky notes. You can use all sizes of sticky notes including the giant size. Let me show you some pictures of my supplies to give you an idea of how you can use this in outlining your book.
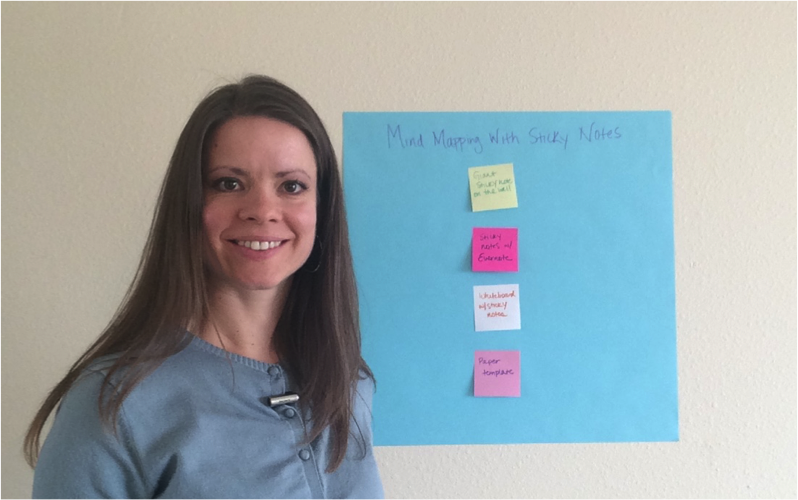
First, take giant sticky notes and put it on the wall.
Second, do your brain dump using your smaller sticky notes of everything you can think of that should be included in your book topic. Don’t edit your thoughts, but simply write down everything that comes to mind and put each idea on a separate sticky note.
Then, you can organize your sticky notes into chapters. Find the topics that you think should be chapter titles and organize them into a logical order. You can then put any ideas that fit within that chapter underneath that chapter title.
After everything is up on the giant sticky note, it can be moved around and rearranged. It can even be taken down, rolled up, and saved for later to transfer to your computers. This is one of my favorite tips on writing a book for those of you who are visual and prefer paper and pen to digital options.
Make this process fun! Sometimes using sticky notes can really help you get unstuck in the writing process.
Another option is to simply put your sticky notes on your table. If you have a big table, put all of the sticky notes on your table and then arrange them in a logical order, chapter by chapter.
If you don’t have sticky notes, you can also use index cards for this strategy. These are various ways to use mind mapping offline, and all work very well.
Option Four: Evernote
The fourth strategy for outlining your nonfiction book is using Evernote. This year, Evernote has become my digital brain. To increase my productivity, I have been making an effort to not check my email constantly throughout the day.
Yes, I’m guilty of making the classic mistake of using my email account as my to-do list.
I realized I needed a different tool, so I started using Evernote. In the beginning, it did require an investment of time on my part to learn how to use it most effectively. I took some training and read a few books to learn how to use Evernote. I found it is not only for to-do lists but something I can use to do so many other things. One of the things you can use Evernote for is outlining a book.
It is very versatile in that Evernote syncs to all of my devices. It syncs to my computer, my iPhone, and my iPad. I can add information to a note on any one of my devices and it will automatically sync to all the other devices. I love this feature.
Within Evernote, I often use dictation to speak out my notes. Sometimes I don’t want to type and speaking into the built-in dictation on my iPhone, iPad, or MacBook Pro helps to be productive and get more accomplished. In fact, I recently outlined a book in Evernote on my phone when I was on a hike using the dictation feature.
However, I’ve had clients who simply dictate on their phone and then email it to themselves. One of my biggest tips on writing a book is to use whatever works best for you. I often say, “don’t try to shove a square peg into a round hole.” So if digital isn’t your thing, try one of the other ideas instead.
To get Evernote, please go here.
Once the software is on your computer, it can be used offline. You will also have access to the program online, so that no matter where you are or if you use someone else’s computer, the program is available.

Evernote tip: use exclamation points at the beginning of the notebook title to have the notebook show up at the top of your list.
What I really like about using this strategy is that you can do this in the time you have available. With Evernote on your phone, it is accessible when you are out and about, waiting in line somewhere, or even waiting in the doctor’s office. This is a great way to use the technology that’s available to get your book outline done.
Option Five: Trello
Another tool you can use to outline your book is called Trello. Trello has a web-based application and mobile apps; therefore, it will sync to all your devices.
I love Trello! I use it for project management with my virtual assistants that work for me.
To get started, go to here.
You can use Trello to a brain dump of every idea you have for your book on separate cards. Then, you can organize the cards into separate lists for each chapter. This is done by simply dragging and dropping the cards between lists.
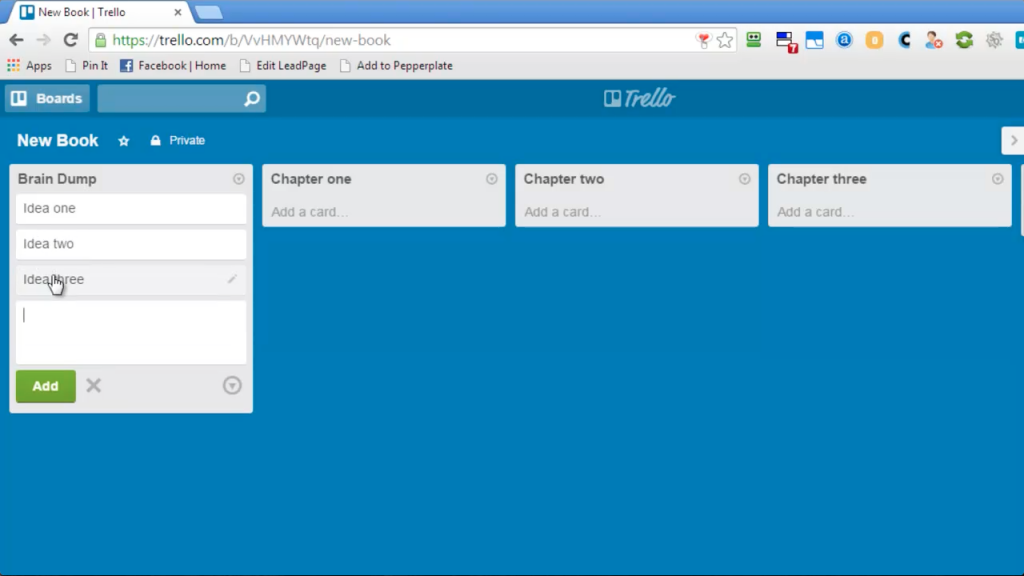
If you are a logical, list-based person, this is a great tool for you to consider. Plus, it’s great for those of you who are visual like me.
Option Six: Scrivener
The sixth strategy you can use to outline your book is Scrivener. Scrivener is a tool that a lot of novelists use, but it can also be used for nonfiction books as well. I have Scrivener and am in the process of learning how to make better use of it. The course that I am taking and recommend is Learn Scrivener Fast.
Start with a new folder to do a brain dump of all the topics you could include in your book. Keep your chapters as folders, and when you have finished the brain dump, start organizing them into a logical order. With Scrivener, reorganizing your work is easily done by dragging and dropping the notes on the corkboard screen.
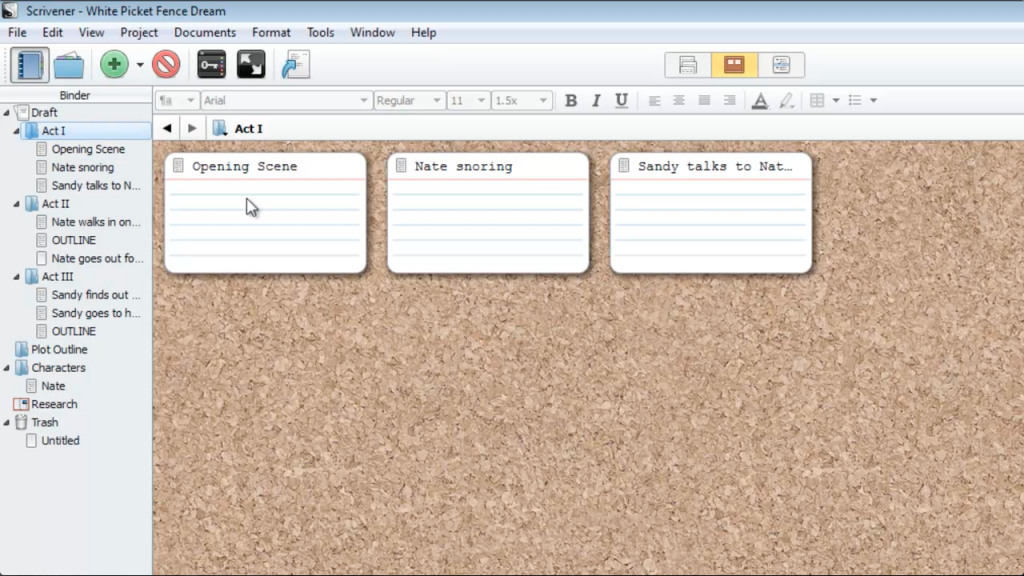
You can also use Scrivener to write your book and export it in the format needed for Kindle and other eBook platforms.
However, one of my tips on writing a book on Scrivener is to realize your editor may not use Scrivener. In that case, you may have to export your book to Word to have it edited. This makes it more difficult to use their built-in formatting tools as you then need to import it back into Scrivener after the editing is finished.
So this is something to consider if you use Scrivener.
Option Seven: Pen and Paper
The seventh way to outline a nonfiction book is using pen and paper. All you need is a notebook and a pen for your book ideas and outlines. If you choose to use this method, I recommend having a dedicated notebook for your book ideas and your outlines.
You can make this process more colorful by using markers if you want. You can even write out “mind maps” by drawing a circle around the text with a line to the chapter topics.
When you outline your book on pen and paper, it is harder to move things around. But you may prefer to use paper and pen. You can use it in a similar way to a whiteboard and do a brain dump and organize your ideas from there.
You can also use sticky notes inside your notebook. Just be careful with them as you could lose your sticky notes if you carry your notebook everywhere with you. Just another one of my little tips on writing a book.
Option Eight: PowerPoint Slides
The eighth way to outline your nonfiction book is to use PowerPoint slides you have already created for presentations or speeches. This is especially useful for speakers who already have a speech they want to turn into a book.
For example, my husband and I have used this method in the past for the book we co-authored Forgiveness Formula. We have both presented speeches on the topic of forgiveness. I had the idea that we should take those talks, which were very well received, and combine them into one book that we would co-author. The book started with our PowerPoint slides as the outline.
Most of the time, your presentation slides are already a basic outline on your topic. You can then fill in additional information and place it into logical order.
This is one of my tips on writing a book for speakers and works great if you already have material created. However, since you’re used to creating Powerpoints for your presentations, which is basically an outline, it can also work for creating an outline from scratch.
Try it and let me know if it works for you.
Option Nine: Blog Posts
If you are a blogger, another one of my tips on writing a book is to start with the blog posts you have already written on the topic. This is often referred to as blogging your book. Many people have done this successfully.
I have actually done this with two of my books. My very first book, Mirror Mirror…Am I Beautiful, started from articles I published on my website. This is a great way to outline a book if you already have a ton of content that you’ve written.
I recommend that you add content into your book that is not freely available online. However, you can start with the content that you already have. Simply go through your blog archives and start writing out your different blog titles on your topic. Then, take those blog post titles and organize them into a logical order. Then, add any information that might be missing or steps you did not blog about yet.
This will save you a ton of time by repurposing content you already have. This is one of my tips on writing a book I personally as often as I can. I love repurposing!
Option Ten: Podcast Episodes
The last idea to outline a nonfiction book is to use your podcast episodes. Not many people are talking about this idea, but it is something I am considering doing with my podcast.
If you have already been podcasting on your topic, you can take your previous show episodes and find all the episodes on the topic of your book. Then, put them in a logical order that makes sense for your book adding any extra content that you may not have covered on the podcast. This is another one of my tips on writing a book.
If you are just starting your podcast, you can create each episode thinking of your book. For example, you can outline each show ahead of time like you would outline a book chapter. Then, you can have your podcast transcribed and use it for content in your book. The transcript will need to be edited, but a majority of your content can come from your podcast.
Tips on Writing a Book
Now, it’s time for your writing to begin! This is where the real action happens. Are you ready to go from outline to finish line? I am going to help you get unstuck and actually get your book done with these tips on writing a book.
There are several considerations I want to share with you about writing before we get into the actual writing methods.
Track Your Progress
The first thing that I encourage you to do is track your progress. I have an Excel spreadsheet that I use. You can get this spreadsheet inside my free 7-day writing challenge here: http://writingweek.com/
If you want to make your own spreadsheet, these are the columns I have in mine:
- The date
- What was written (i.e.blog post, a book, etc.)
- The time of day (morning, afternoon, evening)
- Word count for that session
- Total time
- Dictated or typed?
Then I have a formula that will take the word count divided by the total time, to give me my words per minute.
This can be a powerful tool to help you get more done in your writing time. It will give you clarity, because it will show you the time of day you write best, whether you get more done when you dictate or type. And it will give you encouragement because you will see the progress you have made.
The Seinfeld Calendar
When Jerry Seinfeld was an up-and-coming comic, he developed a calendar system to help him become a better writer. He knew the way to become a better comic was to write more jokes and write more often.
His productivity secret?
He used a wall calendar. For each day he did his writing, he would put a big red X on the calendar. After doing it several days in a row, you start to form a habit.
Basically, don’t break the chain!
And we can use this same concept. It’s one of my tips on writing a book.
You can do this with a calendar on your wall, or there are several apps that will help you with this as well. I use the app Strides to help me form new habits.
Write as if You’re Having a Conversation
When you are writing, I encourage you to write as if you are having a conversation, especially when writing nonfiction books.
Write it as if your target reader was sitting across the table from you in a coffee shop and you are sharing this information with them. Most people prefer this style of writing, as it is easier to read and consume. There will be certain types of nonfiction books that are more technical in nature. However, for most books, it will be best to write as if you are having a conversation.
Ask yourself what questions your readers would ask. If you ever get stuck while writing, imagine you are your reader. What would be the next question they would ask? Have that conversation with them in your mind (or out loud if you’re in the privacy of your home), and write it out. Doing this will help you get the flow going.
You can also ask the 5 W’s. These are questions that journalists ask when they are investigating a story. The 5 W’s are:
- Who
- What
- When
- Where
- Why
Use these questions when you reach a standstill with your writing. They will help you fill in the gaps.
3 Ways to Write Your Book
Now that you have your book outline, it’s time to write your book and cross the finish line. There are three options I recommend for writing your book. These are my tips on writing a book, but make sure to use the one that works best for you. You can read through each one to decide which option is the best for you. You may actually use all three at different times.
Option 1: Speaking Your Book
Did you know you can write a book by simply recording yourself talk? It really can be that simple.
I encourage you to use this method if you prefer speaking to writing. To be honest, this is my preferred method, as I can speak my thoughts much faster than I can write them. You will need to pay to get your audio dictated; however, there are many affordable options available.
You Can Speak Faster Than You Can Type
Typically, you can speak faster than you can type. Research has shown that the average human being types at 31 wpm (words per minute) from a memorized text, and 22 wpm while copying. If you are writing from scratch, it may be even slower than that, but let’s just say the average person can type at a speed of 22-31 wpm.
When someone is recording an audiobook, it is normally read at 150-160 wpm. Slide presentations tend to be closer to 100-125 wpm at a comfortable pace. [Ref]
So, let’s say you can speak your book at a 100 wpm, and let’s say that you can write it at 25 wpm. Therefore you can speak your book four times faster than you can write it. If you are using my Excel spreadsheet, you will notice any trends and what works best for you.
Something fun that I added to my website is a calculator that will tell you how fast you can type. Click here to try the typing speed calculator: https://www.trainingauthors.com/typing-speed/
Typically, you are not able to type as fast as you speak. So, definitely consider this option when determining which method you want to use to write your book.
Tips on Writing a Book: Tools You Can Use
If you have a smartphone or mobile device, the easiest way to record your book is by using an app.
- Dictation Software
You can purchase software like Dragon Naturally Speaking for a one-time fee, and use it to speak your book into your word processing software. I have this software and personally find it difficult to train for accurate transcription. But many people use it successfully.
When using dictation software, I prefer to use the built-in dictation capabilities on my mobile device. I find it to be fairly accurate and easy to use. Since I sit so much at my computer, dictating into my phone or iPad also allows me to stand up or walk around as I dictate.
I love the flexibility and mobility of this option and is one of my tips on writing a book fast.
- Record via Your Mobile Device
That’s right…there’s an app for that!
Rev.com has an app that allows you to speak into the app on your mobile device, record yourself speaking a section of your book, and then send it to Rev.com from your phone to have it transcribed. They charge around $1 per minute for the transcription and have a 48-hour turnaround. You can also upload an MP3 directly to their site online.
A similar app is Transcribeme.com. They also offer $1 per minute transcription with a two to three-day turnaround. However, you can upgrade to $3 per minute and they will send you a fully edited transcript.
- Apps that record your audio only
I introduced my mom to the DropVox app on her phone to record audio. It is so simple. All you have to do is press the record button, speak, and it will automatically upload to a folder in your DropBox account. Then you can access the audio on your computer and send it to your transcriptionist.
- Recording on Your Computer
If you are going to record on your computer, you will need a microphone. I personally use a Blue Yeti microphone to record high-quality audio.
Then you will need the software to record from your computer. You can use a free software called Audacity. It is very simple to use once you learn it, but you can also record on your computer.
For this book, I recorded the audio with Camtasia and my Blue Yeti microphone. This way I could record a tutorial video showing the mind map on the screen at the same time that I recorded my audio to be transcribed. I love repurposing my content in multiple ways, and this way I can use the video and mind map as a gift for my readers. In fact, make sure you can download it for free here.
If you are busy (and most of us fall into that category), I recommend using your smartphone or mobile device to record your book while on the go. Therefore, you can work on your book while you are waiting to pick up your kids, when you are waiting in the line at the car wash, on your lunch break, or in the small gaps of time you have in your day-to-day life.
To give you an example, the transcript of my book, Procrastination to Publication, was originally around 10,000 words and my audio was about an hour long. Therefore, think of it like this… once you have your outline ready, you simply need to find about an hour of time to record your book. That sounds a lot more doable than spending hours and hours sitting in front of a computer typing. I truly believe anyone can find time to do this!
Transcribing Your Audio
Once you have recorded your audio, you will need to have it transcribed. This is where Rev.com or Transcribeme.com can do the work for you.
You can also use Fiverr.com and look up transcriptionists on their site. What I recommend is sorting by rating, so you get the highest rating first and look closely at the reviews. Just know that on Fiverr, it can be hit or miss. Some people can be really good. Once you find someone you like, try to stick with them. Typically you can get about 10-15 minutes of audio transcribed for about $5.
Now, that we’ve covered speaking your book, let’s talk about another option I use often in my tips for writing a book.
Option #2: Write Your Book in Blocks of Time
The second option is to write your book in blocks of time. I recommend using this method if you have more time than money and if you prefer writing to speaking. This is also a great option to use when you have the ability to set aside blocks of time in your schedule to write.
I highly recommend writing in blocks of time, based on your outline. It helps you to be so much more productive. Once you get into the flow of writing, an outline makes it easier to keep writing. On the flip side, it is harder to start and stop when you are writing a book.
I like to use the illustration of driving a car. When you are driving a car on the highway and you accelerate from 15 mph to 60 mph, it takes some time to get up to that speed, especially if you have an older car like we do. However, if you are already at 60 mph on the highway, it is much easier to stay at that speed. If you have to keep stopping and starting, it is going to take you much longer to get to where you need to go than if you simply stayed at the same speed.
It is the same way with writing. If you can get into your writing zone, it will be much easier to write for three to four hours, than to write for one hour three to four different times. However, if you only have small chunks of time to write, use whatever time you do have.
What is the writing zone?
Here is an example:
1) Gather everything you need – all your tools, resources, etc.
2) Go to a place with minimal distractions.
3) Have some snacks, water, and anything else you might need to fuel your body while you write. (Coffee, anyone?)
4) Turn off all incoming notifications.
5) Have access to your book outline.
6) Write, write, and write some more!
Go on a Writing Date!
I recommend that you go on a writing date. When you go on a writing date, you set aside a specific chunk of time and go somewhere specifically to write. You might schedule your writing date for three to four hours, it could be an entire day, or it might even be an entire weekend.
I have an author friend who is very busy. She has several kids, she is a pastor’s wife, she works outside the home, she writes books, she does the marketing for her books, she volunteers in her community, etc. You get the idea. Therefore, when she wants to finish a book, she will actually go on a writing retreat. She will set aside an entire weekend and will go to a place outside her home to focus on writing.
I have done books both ways, very successfully. Sometimes I will spend several hours in our local coffee shop. For one of my books, my husband and I went away to a retreat for the weekend, and I was able to finish a majority of the book then.
It’s amazing how productive you can be when you set aside intentional time to write.
I do recommend removing as many distractions as possible, including all incoming notifications. I know this can be really hard in our technology-connected society. This means turning off your phone, don’t check emails, turn off Skype, Facebook, and anything else that might distract you during your writing time. This way you can stay focused. If needed, you can let a few close friends and family know you won’t be answering your phone/texts; you can even set an autoresponder to your email that you will be unavailable during that time.
Tips on Writing a Book: Time Boxing
Another technique you can use to boost your productivity during your writing sessions is time boxing.
The time boxing system consists of three simple steps:
1) Decide what you want to get done on your book. Choose a smaller section that you can get done in a shorter amount of time.
2) Assign a specific time to each section of writing you want to get done. Choose 30 minutes to three hours.
3) Start a timer (like an egg timer), and focus on nothing but finishing that section of your book. This means you don’t answer the phone, you don’t get up for a drink, you don’t log onto Facebook. You remain focused on the task at hand!
If you practice these three simple steps regularly, it will totally revolutionize the way you get things done in your life – guaranteed!
Any timer will work, but I have a timer for my computer I have used called Productivity Coach. It is available within the member’s area of Author Audience Academy.
Option #3: Hire a Ghostwriter
The third option is to hire a ghostwriter. Did you realize you don’t have to actually have to write the book yourself to publish a book? Many popular authors have used ghostwriters to write their books. You have that option as well. Use this method if you want a professional product, with as little time invested into the process as possible.
I don’t think many will choose this option, but I wanted to mention it. This option will definitely take longer ,as you will be at the mercy of your ghostwriter. They usually require a certain amount of time to finish your project, whereas when you write the book yourself, you can get it done fast. A ghostwriter will also require a bigger investment up front.
I used this option once for a book, and it ended up working out well for me. I used a ghostwriter I already knew. I knew her writing style and I was comfortable with her work ethic.
You do need to be selective in who you choose to work with, as this is going to be your book with your name on it. You should have a signed contract before starting the project. This contract should say that you maintain the copyright to anything they write and that the book will be published under your name.
The ghostwriter is writing for what you pay them at that moment. They are exchanging their time for money. You are able then to make profits on the book royalties forever. That is the trade-off.
Where do you find a ghostwriter? Ghostwriters.org has a list of writers. I have not personally used them, but it is a resource to consider. I also recommend checking out Elance.com for writers. You can do a smaller project with someone to get a taste for their writing style, then go from there. There are a lot of ghostwriters that will work for you, but you have to do some research and find the right fit for you.
So again, the three options to write your book are to speak your book, to write your book in blocks of time, or to hire a ghostwriter.
At this point, you need to decide which option you are going to choose and just start writing.
There are two simple rules to writing as follows:

Conclusion
There are many ways to outline and write a nonfiction book and I have shared only a few tips on writing a book. I hope you found them helpful
Here is a recap of the strategies we covered:
Tips on Writing a Book: Ten Ways to Outline Your Book
- Whiteboard
- Mind Mapping Software
- Sticky Notes
- Evernote
- Trello
- Scrivener
- Pen and Paper
- PowerPoint Slides
- Blog Posts
- Podcast Episodes
Tips on Writing a Book: Three Ways to Write Your Book
- Write it in Chunks of Time
- Speak Your Book
- Hire a Ghostwriter
You are now prepared to outline and write your book. You have a system you can use to get more exposure, bring in more business for you, and increase your credibility.
I look forward to hearing about your success. When you finish writing your book, let me know so I can celebrate with you.
If you have other tips on writing a book that work well for you, please share them in the comments below.
If you want to learn more ways to write your book, check out “How to Improve Your Writing”
Get FREE Access to the Book, Video Training, and Mindmap
Before you go, make sure you get the ENTIRE training. Click here to download my book “Outline to Finish Line” (PDF and Kindle), video training and mind map that corresponds with this post and includes my tips on writing a book.
Last Updated: December 10, 2025
At first I want say thank you for this very cool article. Now I am looking for interesting materials which help write my own book. Your article helps young writers structure all knowledges in a head.
You’re very welcome!
This is the best advice I’ve read on writing a book because of the detail on outlining tips and ways in which to write. Thank you! Now I can move forward being more equipped with good resources.
WooHoo! I’m so glad you found it helpful Phyllis!